What’s New For Developers in NetSuite SuiteCommerce 2021.2: How To Build A Basic Website Setup

Home » Blog » Product Updates & Support » What’s New For Developers in NetSuite SuiteCommerce 2021.2: How To Build A Basic Website Setup
 alphabold

SCA(SuiteCommerce Advanced) is an advanced version of the NetSuite suite commerce feature, that is more flexible, Open Source, and easier to understand than Suite Commerce classic feature. SuiteCommerce Advanced is a top-level E-commerce solution provided by oracle NetSuite. It Covers core ERP (Enterprise Resource Planning) operations including inventory management, order management, customer support, marketing, financials, and many more. NetSuite provides a flexible webstore solution for its users to sell/buy their products globally through an online store. After reading this blog, users will be able to set up their initial web store using NetSuite SuiteCommerce 2021.2 without any “CODING”. For this purpose, the user must have SuiteCommerce Advanced enabled NetSuite instance.
Further Read SuiteCommerce – Point of Sale
We can configure a basic webstore by following a few simple steps listed below:
In the SCA instance, some necessary bundles are pre-installed which the user can review by the following navigation. Customization > SuiteBundler > Search & Install Bundles > List.
Pre-installed bundles are listed below. Note of these bundles are necessary for building a webstore so if any of them is not installed then the user must install the missing bundle first.
User must install some additional bundles too that are listed below. User can install bundles by the following navigation Customization > SuiteBundler > Search & Install Bundles.
Users can search bundles through ID or name by using the KEYWORDS field and can initiate the bundle installation process for each required bundle
Our team specializes in providing robust NetSuite SuiteCommerce solutions that cater to your unique business needs. Let us help you navigate the complexities of e-commerce with ease.
Request a DemoSome supporting features should be enabled with the SuiteCommerce feature in the user account to build a webstore. User can verify and enable/disable features by the following navigation Setup > Company > Enable Features.
Features that are necessary to be enabled for configuring webstore are listed below:
Features:
Features:
After installation of all the necessary bundles, the user can create web site setup that will allow him to configure the domain, website fieldsets, SSP application touchpoints, and other functional preferences. To create web site record, go to the setup website record by the following navigation Commerce> Websites >New.
Re-edit website record to add new Domain under domain subtab.
Save website record after saving the domain. After saving the domain you will notice the DNS status as shown in the figure below:

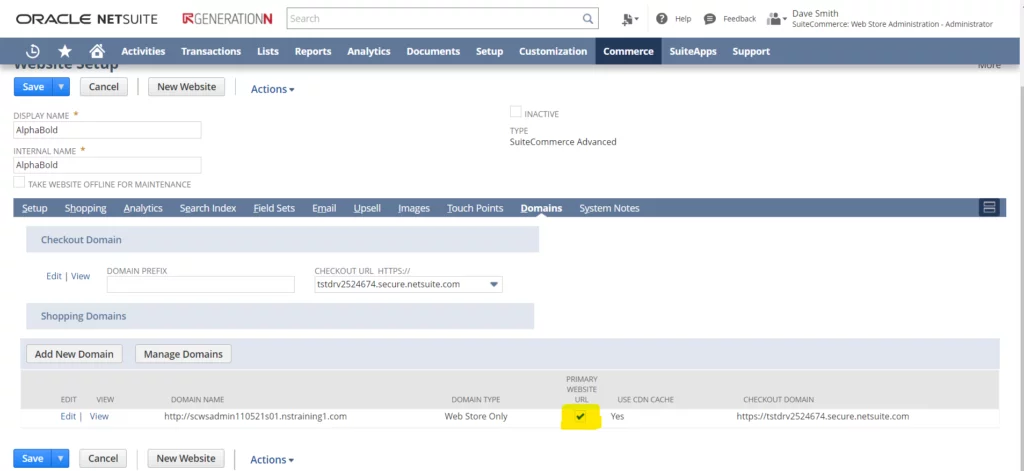
Now Re-edit website record and check PRIMARY WEBSITE URL true, this option will appear after adding domain and saving the website record.

To configure SSP application touchpoints go to the SSP application by following this navigation Commerce > Hosting > SSP Applications view your SSP application (Depends on the bundle version you chose) If your bundle version is 2021.2.0 then you will see the name: SuiteCommerce Advanced – Dev 2021.2.0.
Click on Link to Domain button on the SSP application record. Select your domain under the domain and select field and save the record.

Download our free ERP Software Selection checklist and confidently navigate your journey to the perfect fit.
Learn more
To add required fieldsets under the Field Sets subtab on website record you need to find script fieldset-setup-script.js. You can find this script by the following navigation Documents > Files > File Cabinet > SuiteCommerce Training(If you are using training account) > Web Store Administration > fieldset-setup-script.js or you can search this file in the global search bar.
Edit this file and replace site ID with your website id, you will get your site ID in the URL of your website record.

After replacing site ID execute this script into script debugger (“script debugger is the first real-time, web-based interactive debugger to allow code validation and testing as third-party applications run on the application server”). You can open script debugger by following navigation Customization > Scripting > Script Debugger or can follow the visual GIF Image below.

Place your copied script code into debugger editor and change the default API version 2.0 to 1.0 and execute the script. This script will add all the required field set under Field Sets subtab into the website record.
You can review the change in your Field sets subtab after and before the execution of the script.
After adding required field sets you will need to set a few required preferences in your website record.
After this, scroll down into setup subtab and set default subsidiary as “Generation N US”.
Save website record and open your domain into a new tab/window of your browser. You will see that your basic initial website and the basic SCA theme is configured with them by default as you can visualize in the GIF image below.

Discover how the latest SuiteCommerce features can transform your e-commerce platform. Contact AlphaBOLD today to explore our comprehensive NetSuite SuiteCommerce services and start enhancing your online business.
Request a DemoWe hope this blog helped you in building your own webstore in SCA. In our next blogs, we will be configuring items, themes, extensions, payment methods, and other features that are available in SCA.
If you want to share your thoughts or suggestions? Feel free to leave your comments – we are ready to hear from you.


