Introduction
I am sure that everybody appreciates NetSuite’s Dashboards and their flexibility in relation to custom reports and other business-related key performance indicators.
Sometimes however, out of the box functionality and numerous standard and custom KPI’s in NetSuite are not enough. Frequently, there is a need to source external company information and feed it directly to NetSuite’s Dashboard or perhaps create custom functionality that NetSuite does not offer out-of-the-box.
In order to bridge this gap, NetSuite gives us ‘Custom Portlets’. Custom Portlets are custom SuiteScript scripts that can be deployed directly on NetSuite’s Dashboard.

There are 4 different types of custom portlet scripts:
- List: A list of user-defined column headers and rows. (i.e.: custom Saved Search result portlet)
- Form: A basic data entry form which when submitted can create / modify records in NetSuite,
- HTML: An HTML-based portlet, the most flexible presentation format used to display free-form HTML (images, Flash, custom HTML).
- Links: This default portlet consists of rows of simple formatted content (for example an RSS portlet). Any XML type of feeds could be configured via the Links portlet.
In this article, I will demonstrate how to create and deploy a Custom Portlet in NetSuite. For the purpose of this blog, I will use PowerBI View.

Important Tip: If you wish to source external content to your NetSuite Dashboard through Custom Portlets, your external webpages must be secure and their url should start with ‘https://’
1. Setting Up the SuiteScript Environment
A. Environment Setup:
In order to write SuiteScript code, you will need the following:
- We recommend that you install SuiteCloud IDE. The following SuiteAnswer links will help you with the setup and configurations*:
-
- https://netsuite.custhelp.com/app/answers/detail/a_id/79924 (SuiteScript Developer Guide)
- https://netsuite.custhelp.com/app/answers/detail/a_id/10315 (Setting Up SuiteCloud IDE)
- Generate secure URL from your PowerBi online app
-
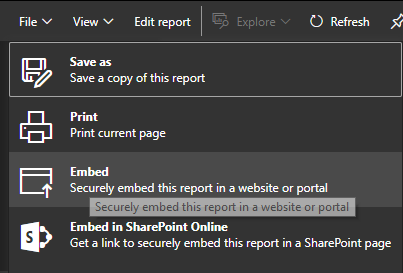
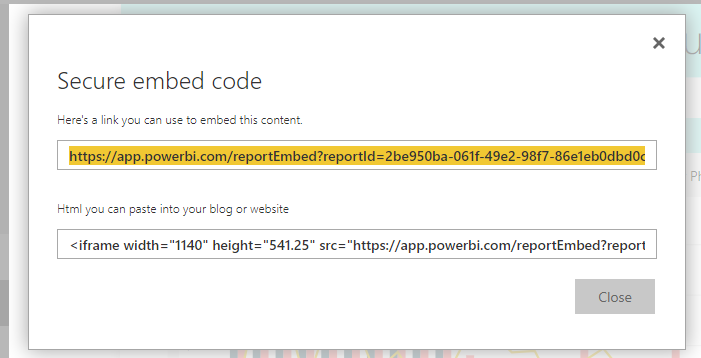
- Open your PowerBI report here: https://app.powerbi.com
- Go to File > Embed (Securely embed this report in a website or portal)
-
- Copy the highlighted link and save it somewhere on your computer.
- Administrator access to your NetSuite Instance.
Elevate your NetSuite Experience!
Ready to harness the full power of NetSuite with custom Power BI portlets? Contact us at AlphaBOLD to optimize your NetSuite solution today!
Request a Demo2. Create and Deploy PowerBI Portlet Example
We are almost there. The last piece of the puzzle will be to create a Custom Portlet that will source and display PowerBi view on NetSuite’s Dashboard.
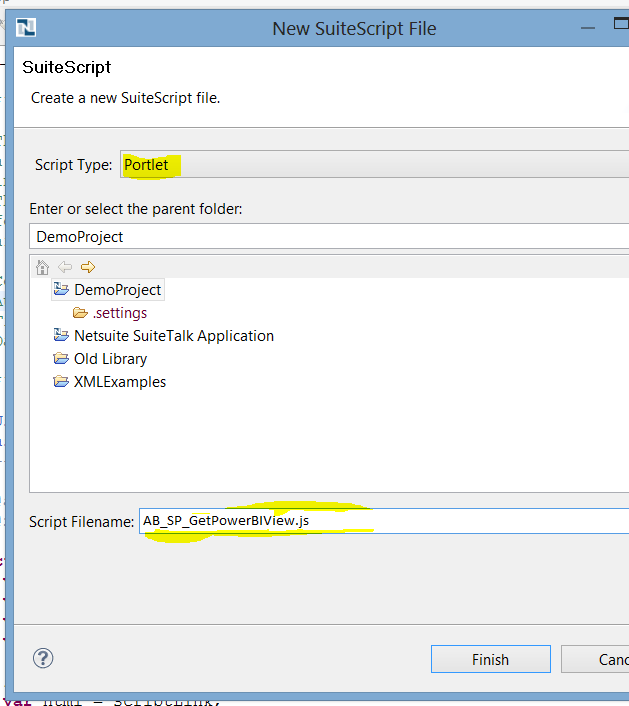
1. Create Portlet SuiteScript File:
-
- You will create SuiteScript file in NetSuite’s IDE
- You script type will be of type: ‘Portlet’
2. Create SuiteScript Code:
- Your code can be very simple. In my example, I created an iFrame that will source the URL generated in PowerBI.
/**
* @NApiVersion 2.x
* @NScriptType Portlet
* @NModuleScope SameAccount
*/
define([],
/**
* @param {portlet} portlet
*/
function() {
/**
* Renders PowerBI Suitelet.
*
* @param {Object} params
* @param {Portlet} params.portlet – The portlet object used for rendering
* @param {number} params.column – Specifies whether portlet is placed in left (1), center (2) or right (3) column of the dashboard
* @param {string} params.entity – (For custom portlets only) references the customer ID for the selected customer
* @Since 2015.2
*/
function renderView(params) {
params.portlet.title = ‘PowerBI Portlet View Example’;
var content = ‘<iframe width=”840″ height=”640″ frameborder=”0″ src=”https://app.powerbi.com/reportEmbed?reportId=2be950ba-061f-49e2-98f7
86e1eb0dbd0c&autoAuth=true&ctid=xxxx-xxxx-xxx-xxxx-xxxxxxxxxx”></iframe>’;
params.portlet.html = content;
} return {
render: renderView
};
});

NetSuite Supply Allocation Guide
NetSuite Supply Allocation Guide offers comprehensive insights and strategies to effectively allocate resources and manage supply chains.
Learn More
3. Deploy your Custom Portlet Script:
- Create a ScuiteScript Record
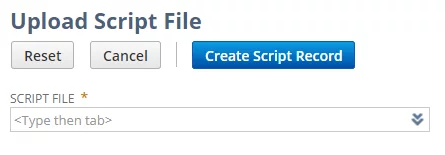
- Go to Customization >> Scripting >> Scripts >> New
-
- Hover over the drop-down menu, you will notice the ‘+’ icon

-
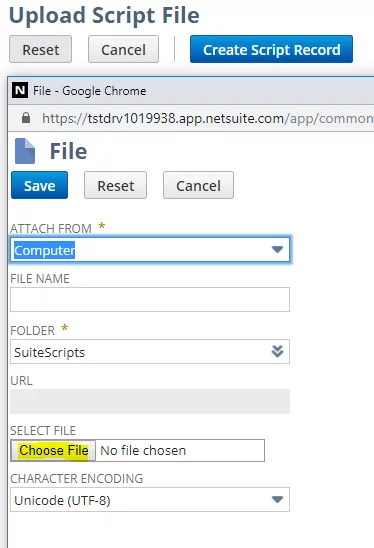
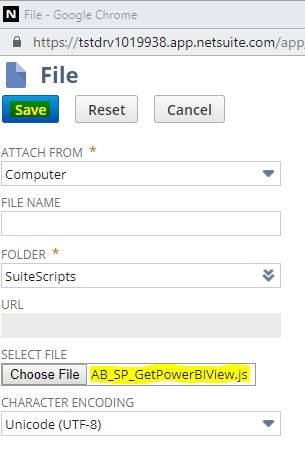
- On the next screen, please select your file by clicking on ‘Choose File’ button. Locate the script file on your machine, click open.
-
- Click [Save] on the next screen.
-
- Based on the file uploaded, on the next screen, you can populate the mandatory fields as illustrated below:
- Based on the file uploaded, on the next screen, you can populate the mandatory fields as illustrated below:
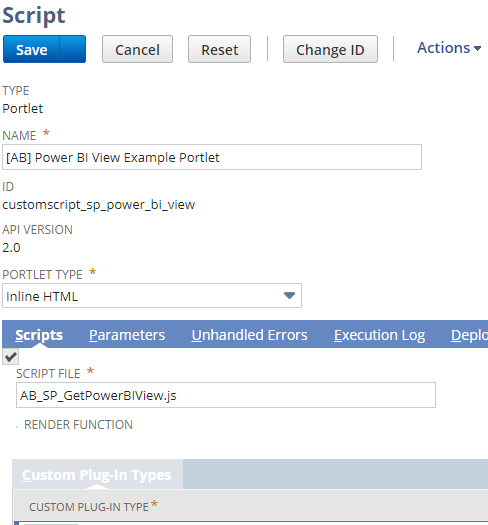
- On the ‘New Script’ page, complete the Mandatory fields:
Important Fields:
- Portlet Type: In this field, you will select Inline HTML as your content will be of type ‘HTML’. If you are interested in learning more about different portlet types, please click here.
[source: https://netsuite.custhelp.com/app/answers/detail/a_id/8159/kw/]
- Name: For consistency ‘Name’ field should match the file name you created in Step 2 > B (you do not need to add ‘.js’ at the end of your name)
- ID: Best practice is to write the script id in the following manner:
‘_ab_sp_power_bi_view’ (all lower case).
Note: When you save the script record, NetSuite will add the ‘customscript’ prefix to the id (i.e.: ‘customscript_ab_sp_power_bi_view’). - Script File: This field refers to the file you created in Step 3 > a.
- [Save] your script record.
Read more about How Power BI and NetSuite Integration Help Businesses
Boost your NetSuite Experience with AlphaBOLD's Expertise
Ready to create custom PowerBI portlets in your NetSuite instance? Reach out to AlphaBOLD for guidance on optimizing your NetSuite dashboard.
Request a Demo4. Configure your Portlet on NetSuite's Dashboard:
- We are almost done! In your NetSuite UI, click on Home tab, this will bring you to NetSuite’s main dashboard.

-
- In the top right of your screen click on Personalize Dashboard Link.
- A slider will open-up below the link that you have clicked.
- Find the ‘Custom Portlet’ icon in the slider and click on it. This will add the portlet to your Dashboard.


- Hover over the top right corner of the portlet and click on ‘set up’
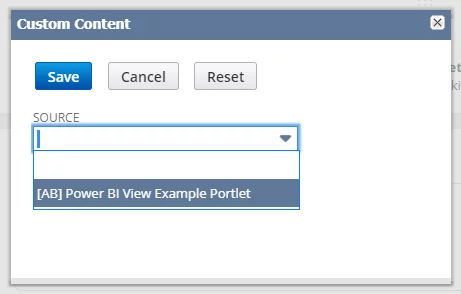
- On the next pop-up pick your Portlet script in the ‘Source’ field and [Save].
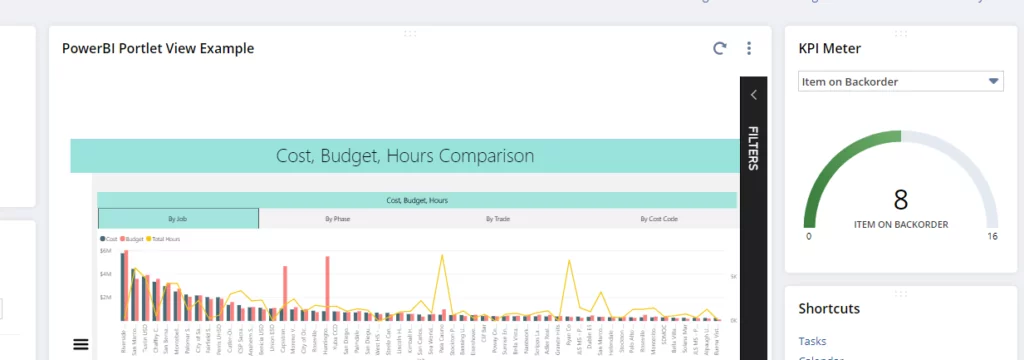
- You are done, congratulations!
Conclusion
There are 3 other type of custom portlets that you can build and show on your dashboard. We will write about these in our future blogs. Should you have any questions or if any of the steps are not clear to you, do not hesitate to contact us.
Read further about NetSuite Project Management with Power BI Integration Impact
Good luck (Suite)Scripting!
Explore Recent Blog Posts


